Quickstart Guide
In this guide, we’ll walk you through the BNG Blaster basics. All the examples here work standalone without having network devices.
First, you need to install the BNG Blaster on your machine.
In the next step, you create a virtual ethernet interface pair. This can be used by the BNG Blaster to send and receive traffic.
sudo ip link add veth1.1 type veth peer name veth1.2
sudo ip link set veth1.1 up
sudo ip link set veth1.2 up
PPPoE
Let’s start with a simple PPPoE setup where BNG Blaster emulates the client and server. On the first interface we use an A10NSP interface. Those interfaces emulate a lightweight PPPoE server by accepting every session. The other interface is configured as PPPoE client.
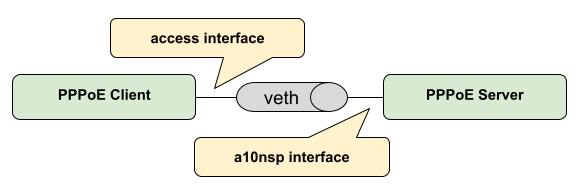
The configured session traffic generates bidirectional traffic between client and server. There is also one more traffic stream bound to the sessions.
pppoe.json:
{
    "interfaces": {
        "a10nsp": [
            {
                "__comment__": "PPPoE Server",
                "interface": "veth1.1"
            }
        ],
        "access": [
            {
                "__comment__": "PPPoE Client",
                "interface": "veth1.2",
                "type": "pppoe",
                "outer-vlan-min": 1,
                "outer-vlan-max": 4000,
                "inner-vlan": 7,
                "stream-group-id": 1
            }
        ]
    },
    "pppoe": {
        "reconnect": true
    },
    "dhcpv6": {
        "enable": false
    },
    "session-traffic": {
        "ipv4-pps": 1
    },
    "streams": [
        {
            "stream-group-id": 1,
            "name": "S1",
            "type": "ipv4",
            "direction": "both",
            "priority": 128,
            "length": 256,
            "pps": 1,
            "a10nsp-interface": "veth1.1"
        }
    ]
}
Now you can start the BNG Blaster with this configuration.
$ sudo bngblaster -C pppoe.json
Mar 30 14:27:59.303904 Resolve network interfaces
Mar 30 14:27:59.303952 All network interfaces resolved
Mar 30 14:27:59.396765 ALL SESSIONS ESTABLISHED
After pressing ctrl+c, the test should be stopped and a detailed
report printed.
Let’s advance the test by enabling some features explained below.
$ sudo bngblaster -C pppoe.json -c 1 -L test.log -l ip -J report.json -j sessions -j streams -P test.pcap -S run.sock -I
-C test.jsonloads the configuration file-c 1defines how many sessions to be emulated, you can increase the number to see what happens…-L test.logcreates an optional logging file-l ipenables the IP address logging-J report.jsongenerates a final JSON report at the end-j sessionsinclude detailed results for every session in the JSON report-j streamsinclude detailed results for every stream in the JSON report-P test.pcapgenerates a PCAP file-S run.sockopens the JSON RPC API socket-Istart interactive courses user interface
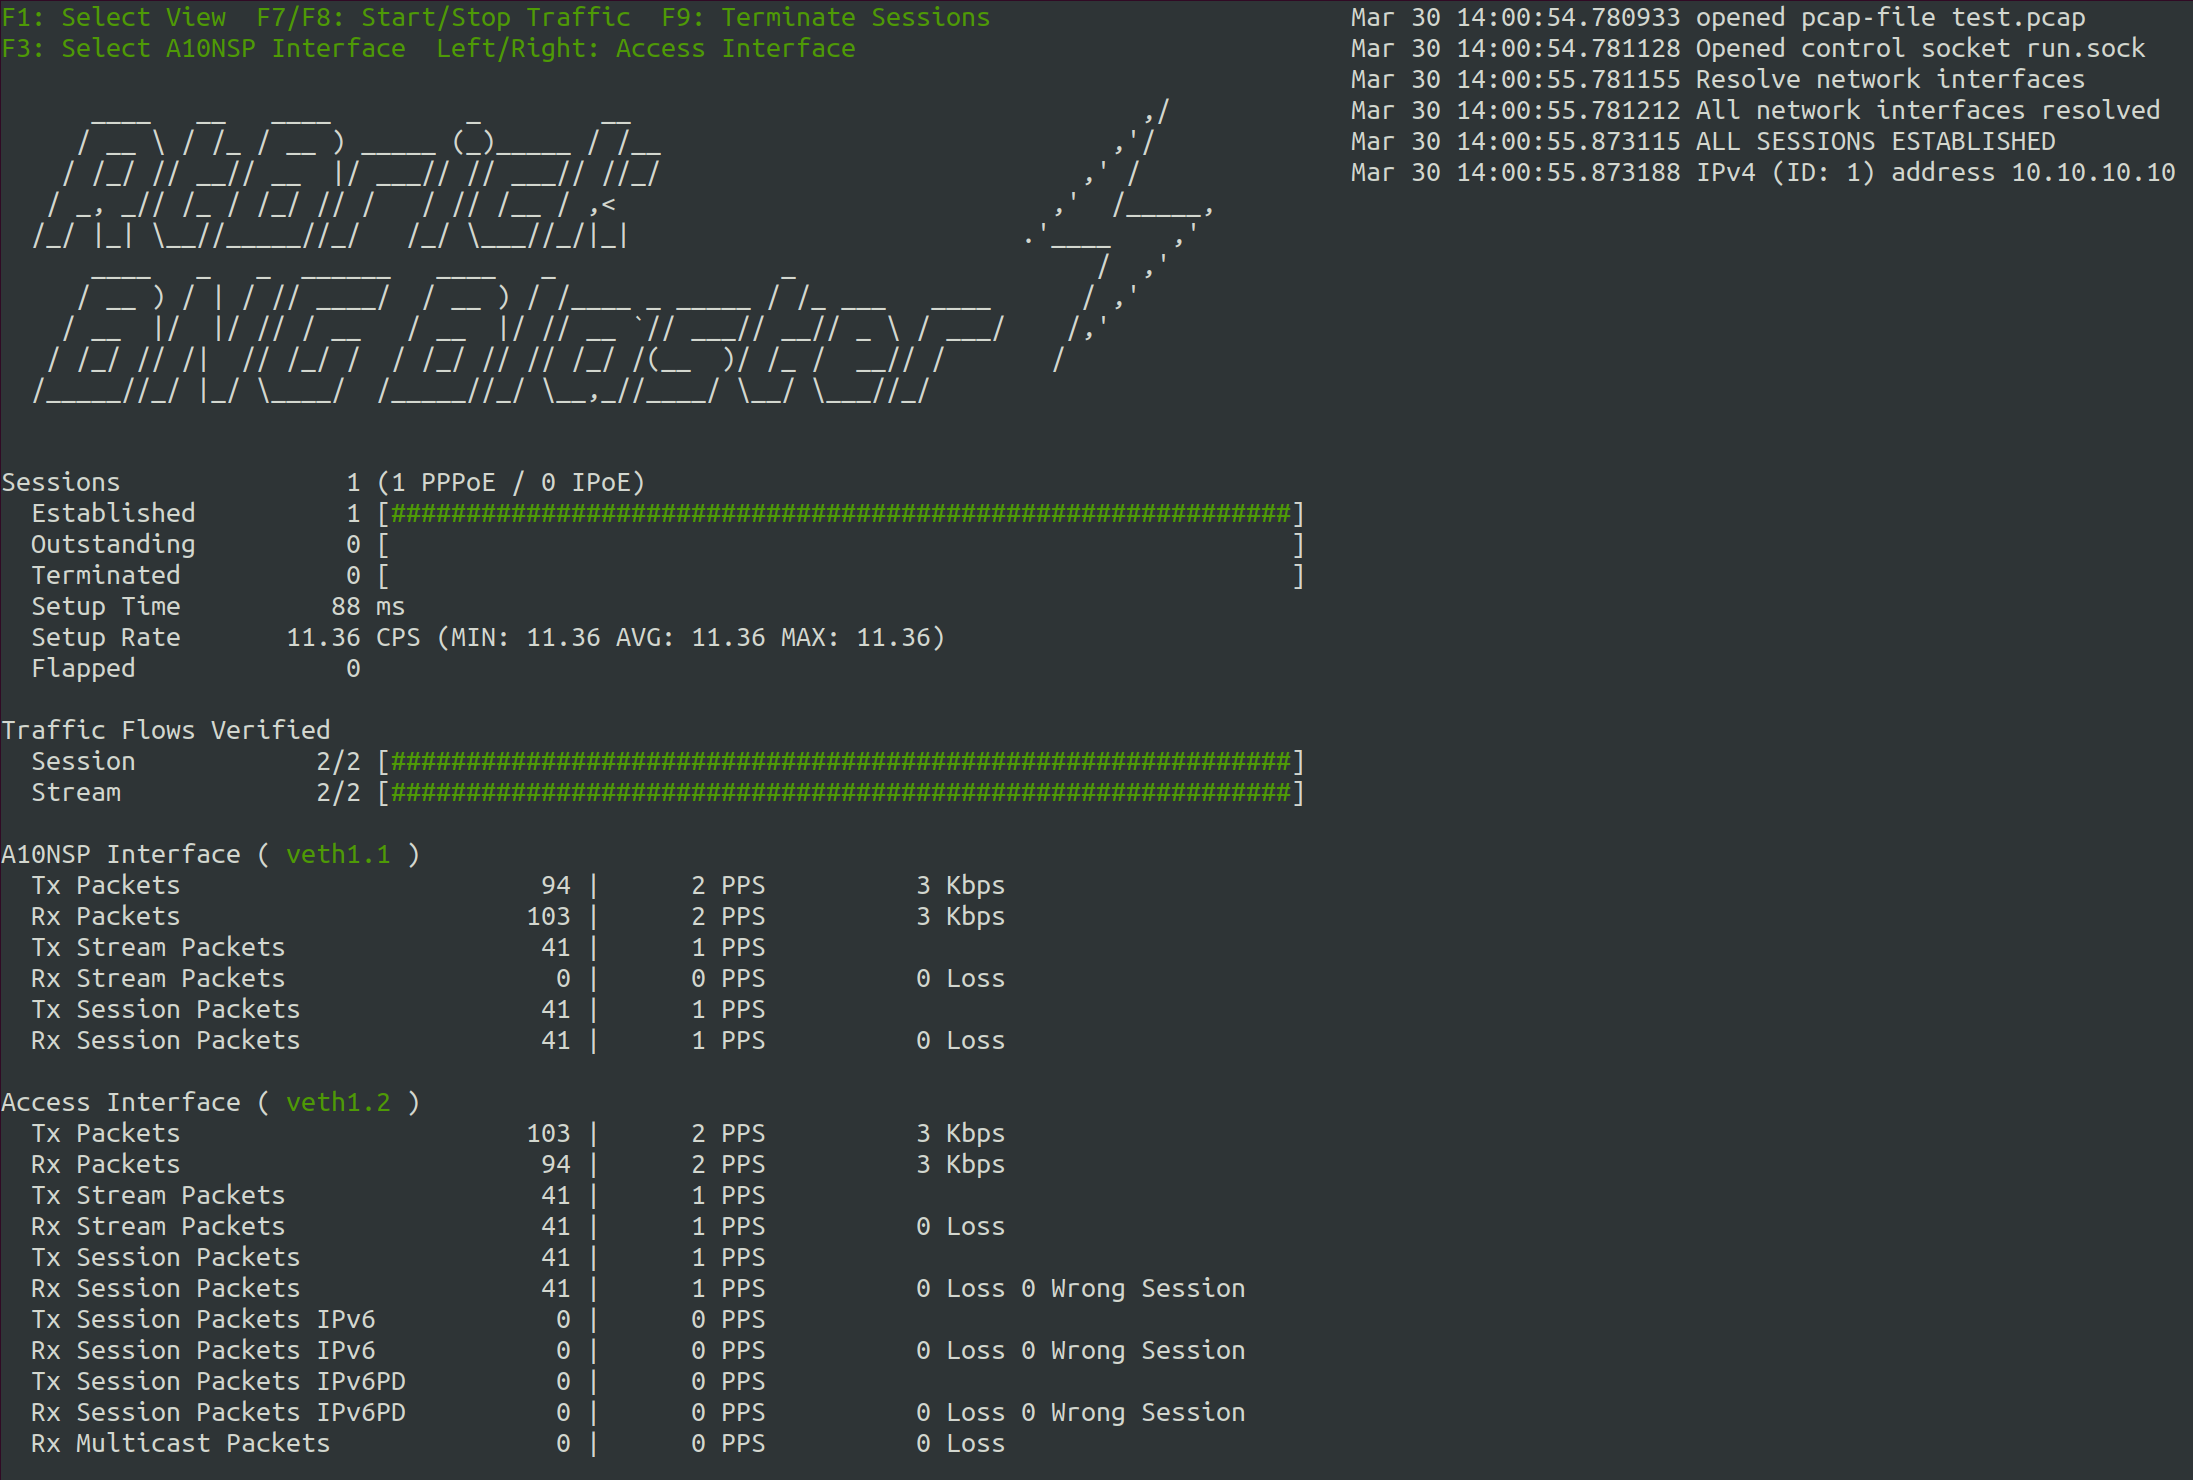
Now let’s try to press F1 to navigate through the different views. All supported
keyboard inputs are listed in the top left corner. After pressing F9 the test
should be stopped.
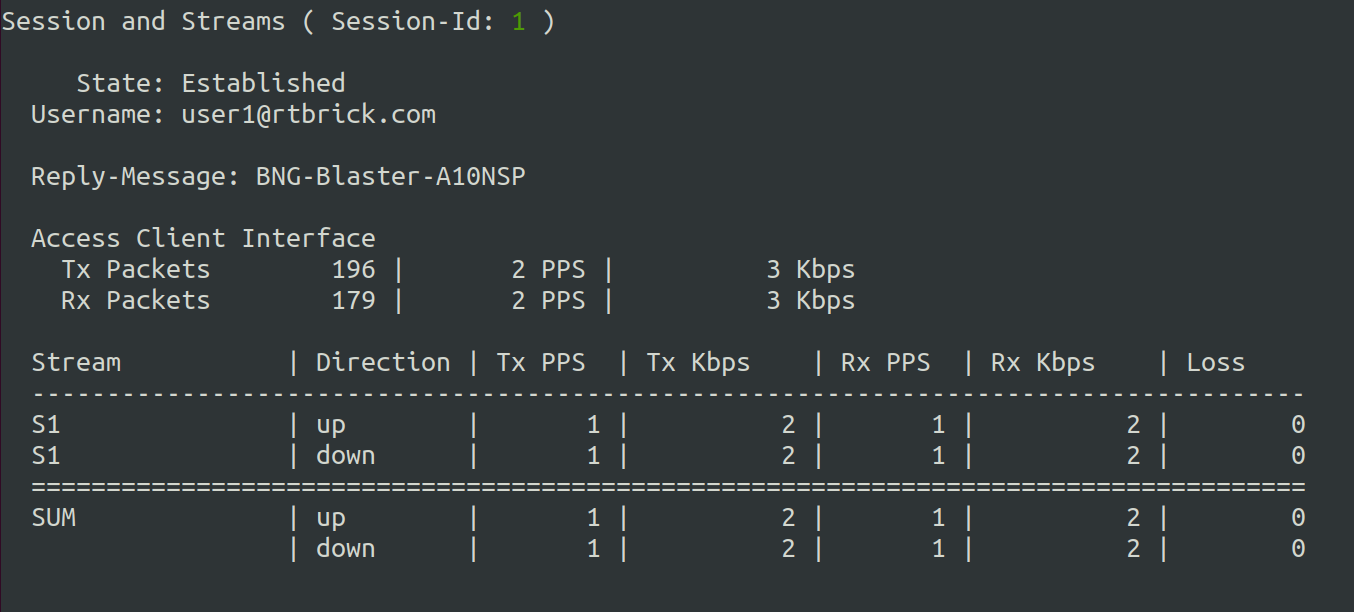
If the test is still running, you can open a second terminal. Then go to the same directory from where you started the BNG Blaster and enter the following command.
$ sudo bngblaster-cli run.sock session-info session-id 1 | jq .
{
    "status": "ok",
    "code": 200,
    "session-info": {
        "type": "pppoe",
        "session-id": 1,
        "session-state": "Established",
        "interface": "veth1.2",
        "outer-vlan": 1,
        "inner-vlan": 7,
        "mac": "02:00:00:00:00:01",
        "username": "user1@rtbrick.com",
        "reply-message": "BNG-Blaster-A10NSP",
        "lcp-state": "Opened",
        "ipcp-state": "Opened",
        "ip6cp-state": "Opened",
        "ipv4-address": "10.10.10.10",
        "ipv4-dns1": "10.12.12.10",
        "ipv4-dns2": "10.13.13.10",
        "dhcpv6-state": "Init",
        "tx-packets": 38,
        "rx-packets": 35,
        "rx-fragmented-packets": 0,
        "session-traffic": {
            "total-flows": 2,
            "verified-flows": 2,
            "downstream-ipv4-flow-id": 2,
            "downstream-ipv4-tx-packets": 13,
            "downstream-ipv4-rx-packets": 13,
            "downstream-ipv4-rx-first-seq": 1,
            "downstream-ipv4-loss": 0,
            "downstream-ipv4-wrong-session": 0,
            "upstream-ipv4-flow-id": 1,
            "upstream-ipv4-tx-packets": 13,
            "upstream-ipv4-rx-packets": 13,
            "upstream-ipv4-rx-first-seq": 1,
            "upstream-ipv4-loss": 0,
            "upstream-ipv4-wrong-session": 0
        },
        "a10nsp": {
            "interface": "veth1.1",
            "s-vlan": 1,
            "qinq-send": false,
            "qinq-received": false,
            "tx-packets": 35,
            "rx-packets": 38
        }
    }
}
You can also try other commands to get familiar with the API.
After the test has stopped, you can also check the final JSON report (jq . report.json),
log, and PCAP files.
DHCP
Let’s repeat all the steps from the PPPoE example before but with the following IPoE DHCP configuration.
dhcp.json:
{
    "interfaces": {
        "a10nsp": [
            {
                "__comment__": "DHCP Server",
                "interface": "veth1.1"
            }
        ],
        "access": [
            {
                "__comment__": "DHCP Client",
                "interface": "veth1.2",
                "type": "ipoe",
                "ipv6": false,
                "outer-vlan-min": 1,
                "outer-vlan-max": 4000,
                "inner-vlan": 7,
                "stream-group-id": 1
            }
        ]
    },
    "access-line": {
        "agent-remote-id": "DEU.RTBRICK.{session-global}",
        "agent-circuit-id": "0.0.0.0/0.0.0.0 eth 0:{session-global}"
    },
    "dhcp": {
        "enable": true,
        "broadcast": false
    },
    "session-traffic": {
        "ipv4-pps": 1
    },
    "streams": [
        {
            "stream-group-id": 1,
            "name": "S1",
            "type": "ipv4",
            "direction": "both",
            "priority": 128,
            "length": 256,
            "pps": 1,
            "a10nsp-interface": "veth1.1"
        }
    ]
}
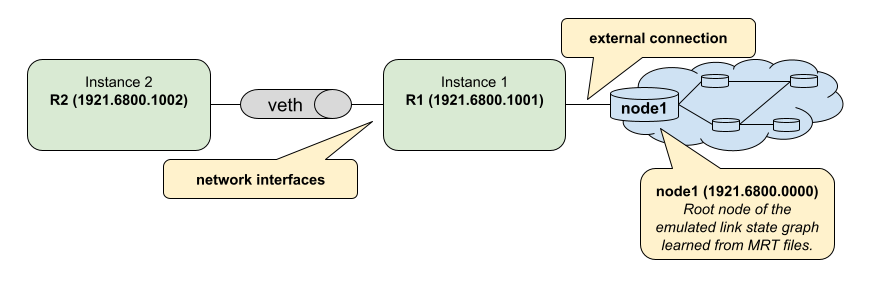
ISIS
In the following example, we create two ISIS nodes (R1 and R2) with an emulated ISIS topology attached to R1 (isis.mrt`).
isis.json:
{
    "interfaces": {
        "network": [
            {
                "interface": "veth1.1",
                "address": "10.0.0.1/24",
                "gateway": "10.0.0.2",
                "address-ipv6": "fc66:1337:7331::1/64",
                "gateway-ipv6": "fc66:1337:7331::2",
                "isis-instance-id": 1,
                "isis-level": 1
            },
            {
                "interface": "veth1.2",
                "address": "10.0.0.2/24",
                "gateway": "10.0.0.1",
                "address-ipv6": "fc66:1337:7331::2/64",
                "gateway-ipv6": "fc66:1337:7331::1",
                "isis-instance-id": 2,
                "isis-level": 1
            }
        ]

    },
    "isis": [
        {
            "instance-id": 1,
            "area": [
                "49.0001/24",
                "49.0002/24"
            ],
            "system-id": "1921.6800.1001",
            "router-id": "192.168.1.1",
            "hostname": "R1",
            "sr-base": 1000,
            "sr-range": 100,
            "sr-node-sid": 1,
            "level1-auth-key": "secret123",
            "level1-auth-type": "md5",
            "external": {
                "mrt-file": "isis.mrt",
                "connections": [
                    {
                        "system-id": "1921.6800.0000.00",
                        "l1-metric": 1000,
                        "l2-metric": 2000
                    }
                ]
            }
        },
        {
            "instance-id": 2,
            "area": [
                "49.0001/24",
                "49.0002/24"
            ],
            "system-id": "1921.6800.1002",
            "router-id": "192.168.1.2",
            "hostname": "R2",
            "sr-base": 1000,
            "sr-range": 100,
            "sr-node-sid": 2,
            "level1-auth-key": "secret123",
            "level1-auth-type": "md5"
        }
    ],
    "streams": [
        {
            "name": "RAW1",
            "type": "ipv4",
            "direction": "downstream",
            "priority": 128,
            "destination-ipv4-address": "192.168.1.2",
            "length": 256,
            "pps": 1,
            "network-interface": "veth1.1"
        }
    ]
}
Now use the included tool lspgen to generate the attached ISIS topology.
$ lspgen -a 49.0001/24 -K secret123 -T md5 -C 1921.6800.1001 -m isis.mrt
Mar 30 14:54:19.647569 Add context for instance default, protocol isis, topology unicast
Mar 30 14:54:19.647630 Add connector to 0x192168001001
Mar 30 14:54:19.647633 LSP generation parameters
Mar 30 14:54:19.647639  Area 49.0001/24
Mar 30 14:54:19.647642  Level 1, sequence 0x1, lsp-lifetime 65535
Mar 30 14:54:19.647645  Authentication-key secret123, Authentication-type md5
Mar 30 14:54:19.647648  IPv4 Node Base Prefix 192.168.0.0/32
Mar 30 14:54:19.647651  IPv4 Link Base Prefix 172.16.0.0/31
Mar 30 14:54:19.647654  IPv4 External Base Prefix 10.0.0.0/28
Mar 30 14:54:19.647657  IPv6 Node Base Prefix fc00::c0a8:0/128
Mar 30 14:54:19.647660  IPv6 Link Base Prefix fc00::ac10:0/127
Mar 30 14:54:19.647669  IPv6 External Base Prefix fc00::a00:0/124
Mar 30 14:54:19.647672  SRGB base 10000, range 2000
Mar 30 14:54:19.647678 Generating a graph of 10 nodes and 20 links
Mar 30 14:54:19.647813  Root node 1921.6800.0000.00
Finally, you can start the BNG Blaster.
$ sudo bngblaster -C isis.json -l isis -P test.pcap -S run.sock
Mar 30 14:56:11.981279 Init IS-IS instance 1
Mar 30 14:56:11.981314 Load ISIS MRT file isis.mrt
Mar 30 14:56:11.981335 Init IS-IS instance 2
Mar 30 14:56:12.031917 Add network interface veth1.1 to IS-IS instance 1
Mar 30 14:56:12.087877 Add network interface veth1.2 to IS-IS instance 2
Mar 30 14:56:12.087971 opened pcap-file test.pcap
Mar 30 14:56:12.088013 Opened control socket run.sock
Mar 30 14:56:13.088035 Resolve network interfaces
Mar 30 14:56:13.088050 All network interfaces resolved
Mar 30 14:56:22.093906 ISIS L1 adjacency UP on interface veth1.2
Mar 30 14:56:22.093964 ISIS L1 adjacency UP on interface veth1.1
If the test is still running, you can open a second terminal, go to the same directory from where you started the BNG Blaster and enter the following command.
$ sudo bngblaster-cli run.sock isis-adjacencies
{
    "status": "ok",
    "code": 200,
    "isis-adjacencies": [
        {
            "interface": "veth1.1",
            "type": "P2P",
            "level": "L1",
            "instance-id": 1,
            "adjacency-state": "Up",
            "peer": {
                "system-id": "1921.6800.1002"
            }
        },
        {
            "interface": "veth1.2",
            "type": "P2P",
            "level": "L1",
            "instance-id": 2,
            "adjacency-state": "Up",
            "peer": {
                "system-id": "1921.6800.1001"
            }
        }
    ]
}
You can also try other commands to get familiar with the API.
BGP
In the following example, we create a BGP session between BNG Blaster and gobgp.
sudo apt install gobgpd
Therefore, we use again the veth interface pair. But this time the side used by gobgp needs an IP address and TCP checksum offloading must be disabled!
sudo ip link add veth1.1 type veth peer name veth1.2
sudo ip link set veth1.1 up
sudo ip link set veth1.2 up
# disable checksum offloading
sudo ethtool -K veth1.1 tx off
sudo ethtool -K veth1.2 tx off
# add IPv4 address for gobgpd
sudo ip address add 192.168.92.1/24 dev veth1.1
Following the gobgp and BNG Blaster configuration files needed.
gobgpd.conf:
[global.config]
    as = 65001
    router-id = "192.168.92.1"
    local-address-list = ["192.168.92.1"]

[[neighbors]]
    [neighbors.config]
        peer-as = 65001
        neighbor-address = "192.168.92.2"
    [[neighbors.afi-safis]]
        [neighbors.afi-safis.config]
        afi-safi-name = "ipv4-unicast"
    [[neighbors.afi-safis]]
        [neighbors.afi-safis.config]
        afi-safi-name = "ipv6-unicast"
    [[neighbors.afi-safis]]
        [neighbors.afi-safis.config]
        afi-safi-name = "ipv4-labelled-unicast"
    [[neighbors.afi-safis]]
        [neighbors.afi-safis.config]
        afi-safi-name = "ipv6-labelled-unicast"
bgp.json:
{
    "interfaces": {
        "network": {
            "interface": "veth1.2",
            "address": "192.168.92.2/24",
            "gateway": "192.168.92.1"
        }
    },
    "bgp": [
        {
            "local-ipv4-address": "192.168.92.2",
            "peer-ipv4-address": "192.168.92.1",
            "raw-update-file": "out.bgp",
            "local-as": 65001,
            "peer-as": 65001
        }
    ]
}
Use the included tool bgpupdate to generate a BGP update file
with 10.000 IPv4 and 10.000 IPv6 prefixes.
bgpupdate -a 65001 -l 100 -n 192.168.92.2 -p 11.0.0.0/28 -P 10000
bgpupdate -a 65001 -l 100 -n 192.168.92.2 -p fc66:11::/64 -P 10000 --append
Start the gobgp daemon.
$ sudo -E gobgpd  -f gobgpd.conf
{"level":"info","msg":"gobgpd started","time":"2022-04-08T14:51:03+02:00"}
{"Topic":"Config","level":"info","msg":"Finished reading the config file","time":"2022-04-08T14:51:03+02:00"}
{"level":"info","msg":"Peer 192.168.92.2 is added","time":"2022-04-08T14:51:03+02:00"}
{"Topic":"Peer","level":"info","msg":"Add a peer configuration for:192.168.92.2","time":"2022-04-08T14:51:03+02:00"}
Finally, start the BNG Blaster in another terminal window.
$ sudo bngblaster -C bgp.json -l bgp -S run.sock
Apr 08 14:53:51.870722 Loaded BGP RAW update file out.bgp (138.63 KB, 36 updates)
Apr 08 14:53:51.904266 BGP (veth1.2 192.168.92.2 - 192.168.92.1) init session
Apr 08 14:53:51.904293 BGP (veth1.2 192.168.92.2 - 192.168.92.1) state changed from closed -> idle
Apr 08 14:53:51.904369 Opened control socket run.sock
Apr 08 14:53:52.904359 Resolve network interfaces
Apr 08 14:53:52.904389 All network interfaces resolved
Apr 08 14:53:53.904448 BGP (veth1.2 192.168.92.2 - 192.168.92.1) state changed from idle -> connect
Apr 08 14:53:53.905659 BGP (veth1.2 192.168.92.2 - 192.168.92.1) state changed from connect -> opensent
Apr 08 14:53:53.907888 BGP (veth1.2 192.168.92.2 - 192.168.92.1) open message received with peer AS: 65001, hold-time: 90s
Apr 08 14:53:53.907903 BGP (veth1.2 192.168.92.2 - 192.168.92.1) state changed from opensent -> openconfirm
Apr 08 14:53:53.907917 BGP (veth1.2 192.168.92.2 - 192.168.92.1) state changed from openconfirm -> established
Apr 08 14:53:54.907989 BGP (veth1.2 192.168.92.2 - 192.168.92.1) raw update start
Apr 08 14:53:55.182885 BGP (veth1.2 192.168.92.2 - 192.168.92.1) raw update stop after 0s
If the test is still running, you can open one more terminal, go to the same directory from where you started the BNG Blaster and enter the following command.
$ sudo bngblaster-cli run.sock bgp-sessions
{
    "status": "ok",
    "code": 200,
    "bgp-sessions": [
        {
            "interface": "veth1.2",
            "local-address": "192.168.92.2",
            "local-id": "1.2.3.4",
            "local-as": 65001,
            "local-hold-time": 90,
            "peer-address": "192.168.92.1",
            "peer-id": "1.92.168.192",
            "peer-as": 65001,
            "peer-hold-time": 90,
            "state": "established",
            "raw-update-state": "done",
            "raw-update-file": "out.bgp",
            "stats": {
                "messages-rx": 3,
                "messages-tx": 38,
                "keepalive-rx": 2,
                "keepalive-tx": 1,
                "update-rx": 0,
                "update-tx": 36
            }
        }
    ]
}
You can also try other commands to get familiar with the API.
The following command shows the session in gobgp.
$ gobgp neighbor 192.168.92.2
BGP neighbor is 192.168.92.2, remote AS 65001
BGP version 4, remote router ID 4.3.2.1
BGP state = established, up for 00:01:36
BGP OutQ = 0, Flops = 0
Hold time is 90, keepalive interval is 30 seconds
Configured hold time is 90, keepalive interval is 30 seconds

Neighbor capabilities:
    multiprotocol:
        ipv4-unicast:       advertised and received
        ipv6-unicast:       advertised and received
        ipv4-labeled-unicast:       advertised and received
        ipv6-labeled-unicast:       advertised and received
    route-refresh:  advertised
    4-octet-as:     advertised and received
Message statistics:
                        Sent       Rcvd
    Opens:                  2          2
    Notifications:          0          0
    Updates:                0         72
    Keepalives:             5          4
    Route Refresh:          0          0
    Discarded:              0          0
    Total:                  7         79
Route statistics:
    Advertised:             0
    Received:           20000
    Accepted:               0
If the test is still running, you can add further routes. Therefore first create a new BGP update file.
bgpupdate -a 65001 -l 100 -n 192.168.92.2 -p 22.0.0.0/28 -P 100000 -f update.bgp
Apply this file to the specified BGP session.
sudo bngblaster-cli run.sock bgp-raw-update file update.bgp peer-ipv4-address 192.168.92.1 local-ipv4-address 192.168.92.2
{
    "status": "ok",
    "code": 200,
    "bgp-raw-update": {
        "started": 1,
        "skipped": 0,
        "filtered": 0
    }
}
The parameters peer-ipv4-address and local-ipv4-address are used to filter to which sessions
this update should be applied. Without any of those parameters, the update will be applied to all
sessions.
Check if they are received in the gobgp daemon.
$ gobgp neighbor
Peer            AS  Up/Down State       |#Received  Accepted
192.168.92.2 65001 00:09:36 Establ      |   120000         0
Finally, you can withdraw them again.
bgpupdate -a 65001 -n 192.168.92.2 -p 22.0.0.0/28 -P 100000 -f withdraw.bgp --withdraw
sudo bngblaster-cli run.sock bgp-raw-update file withdraw.bgp
LDP
In the following example, we create two connected LDP instances.
ldp.json:
{
    "interfaces": {
        "capture-include-streams": true,
        "network": [
            {
                "interface": "veth1.1",
                "address": "10.0.0.1/24",
                "gateway": "10.0.0.2",
                "ldp-instance-id": 1
            },
            {
                "interface": "veth1.2",
                "address": "10.0.0.2/24",
                "gateway": "10.0.0.1",
                "ldp-instance-id": 2
            }
        ]
    },
    "ldp": [
        {
            "instance-id": 1,
            "lsr-id": "10.2.3.1",
            "raw-update-file": "out.ldp"
        },
        {
            "instance-id": 2,
            "lsr-id": "10.2.3.2"
        }
    ],
    "streams": [
        {
            "name": "S1",
            "type": "ipv4",
            "direction": "downstream",
            "priority": 128,
            "network-interface": "veth1.2",
            "destination-ipv4-address": "100.0.0.1",
            "ldp-ipv4-lookup-address": "13.37.0.1",
            "pps": 1
        }
    ]
}
Use the included tool ldpupdate to generate an LDP update file
with 10 labeled IPv4 prefixes.
ldpupdate -l 10.2.3.1 -p 13.37.0.0/32 -P 10 -M 10000
Now you can start the BNG Blaster with this configuration.
sudo bngblaster -C ldp.json -l ldp -S run.sock -P ldp.pcap
Network Traffic
In the following example, we create two connected network interfaces and set up RAW traffic streams between them.
network.json:
{
    "interfaces": {
        "network": [
            {
                "interface": "veth1.1",
                "address": "192.168.0.1/24",
                "gateway": "192.168.0.2"
            },
            {
                "interface": "veth1.2",
                "address": "192.168.0.2/24",
                "gateway": "192.168.0.1"
            }
        ]
    },
    "streams": [
        {
            "name": "S1",
            "type": "ipv4",
            "pps": 1,
            "network-interface": "veth1.1",
            "destination-ipv4-address": "192.168.0.2"
        },
        {
            "name": "S2",
            "type": "ipv4",
            "pps": 1,
            "network-interface": "veth1.2",
            "destination-ipv4-address": "192.168.0.1"
        }
    ]
}
Now you can start the BNG Blaster with stream reports enabled to get extensive result of every single stream at the end of the test.
$ sudo bngblaster -C network.json -l loss -J report.json -j streams -S run.sock -I
Such a configuration with two network interfaces in the same network can be used to test layer two network QoS configurations or filters. The same would also work through a routed network with two network interfaces in different networks.